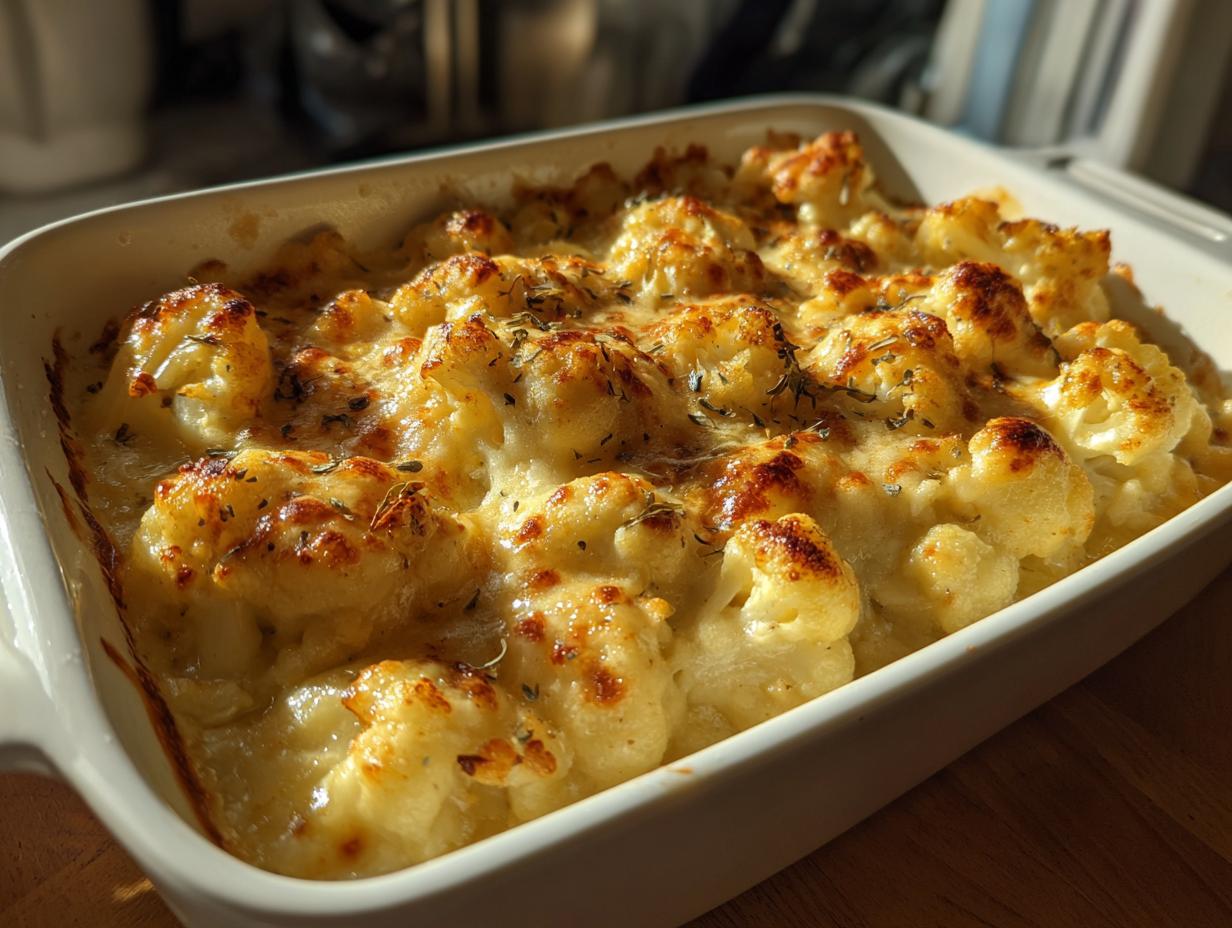
You know that craving for mac and cheese that hits at the worst possible times? I’ve been there too—standing in front of the fridge at midnight, wishing for something creamy and cheesy but not *too* guilty. That’s how my cauliflower “mac” and cheese was born! It’s got all the gooey, comforting goodness of the classic, but with a sneaky veggie twist that makes me feel way better about eating it (and serving seconds to my kids). The cauliflower melts into the sauce beautifully, and with a blend of sharp cheddar and a hint of mustard powder, even the pickiest eaters won’t suspect they’re getting an extra serving of vegetables. Trust me, this one’s a game-changer for weeknight dinners.
Why You’ll Love This Cauliflower “Mac” and Cheese
Oh, where do I even start? This dish is my go-to for so many reasons, and I just know you’re going to adore it too.
- It’s seriously healthier, but you’d never know it from the rich, creamy taste.
- It comes together so easily on even the craziest of weeknights.
- And honestly, it’s completely family-friendly—my kids gobble it up and never question the “mac”!
Ingredients for Cauliflower “Mac” and Cheese
Okay, let’s gather our goodies! Here’s everything you’ll need to make this dreamy, cheesy masterpiece. I’ve learned through trial and error that quality ingredients really make the difference here – no skimping on that cheese, okay?
- 1 medium head cauliflower, cut into bite-sized florets (about 4 cups – and yes, fresh is best!)
- 2 cups shredded sharp cheddar cheese (please shred it yourself if you can – those pre-shredded bags have weird anti-clumping stuff)
- 1/2 cup whole milk (2% works in a pinch, but whole gives that luscious creaminess)
- 2 tablespoons butter (the real deal – none of that margarine business)
- 1 teaspoon mustard powder (secret flavor booster – trust me on this)
- 1/2 teaspoon garlic powder (not garlic salt – we’ll add regular salt separately)
- Salt and pepper to taste (I do about 1/2 tsp salt and 1/4 tsp pepper to start)
- 1/4 cup grated Parmesan cheese (optional, but oh-so-good for that golden crust)
See? Nothing too fancy, just good, honest ingredients that work some serious magic together. Now let’s get cooking!
How to Make Cauliflower “Mac” and Cheese
Alright, let’s turn these simple ingredients into creamy, dreamy comfort food! I promise it’s easier than you think. Just follow these steps, and you’ll have a dish that’ll make everyone forget they’re eating vegetables.
Step 1: Prep the Cauliflower
First things first – we need to get our cauliflower ready. I use a steamer basket in a large pot with about an inch of boiling water. Toss in those florets (don’t crowd them!) and let them steam for 8-10 minutes. You want them tender but not mushy – think “al dente” pasta texture. Here’s my pro tip: drain them well and pat dry with a clean towel. Cauliflower holds water like a sponge, and we don’t want a watery cheese sauce!
Step 2: Make the Cheese Sauce
While the cauliflower’s steaming, let’s make that luscious sauce. Melt the butter in a saucepan over medium heat – careful not to let it brown! Whisk in the milk, mustard powder, garlic powder, salt, and pepper. Now the magic happens: gradually stir in the shredded cheddar, letting each handful melt completely before adding more. Keep stirring until it’s smooth as silk – if it seems too thick, add a splash more milk. This is when my kitchen smells like cheesy heaven!
Step 3: Combine and Bake
Time to bring it all together! Gently fold the steamed cauliflower into the cheese sauce (be nice – we don’t want mashed cauliflower!). Pour everything into a greased baking dish and sprinkle that optional Parmesan on top. Pop it in a 375°F (190°C) oven for 15-20 minutes until it’s bubbly around the edges. For extra crispiness, I sometimes broil it for the last 2 minutes – just watch it like a hawk so it doesn’t burn!
Tips for Perfect Cauliflower “Mac” and Cheese
After making this dish more times than I can count, I’ve picked up some tricks that take it from good to “can I have thirds?” good. Here are my must-know tips for cauliflower mac and cheese perfection!
The Drain Game: Don’t skip drying your steamed cauliflower thoroughly. I spread mine on a clean kitchen towel for a few minutes – those extra drops of water can make your sauce thin and sad. A little patience here makes all the difference.
Crispy Top Trick: That last-minute broil is my secret weapon. Just 2-3 minutes under the broiler gives you those irresistible golden-brown spots. Set a timer though – it goes from perfect to burnt in seconds!
Mix-Ins Magic: Want to take it up a notch? Crumbled bacon or sautéed onions add amazing texture. My kids love when I stir in some diced ham before baking – it’s like a full meal in one dish!
Cheese Matters: If your sauce seems grainy, your heat might be too high when melting the cheese. Low and slow is the way to go for that velvety smooth texture we all crave.
Variations for Cauliflower “Mac” and Cheese
Oh, the possibilities! This recipe is like a blank canvas for your cheesy dreams. Swap cheddar for Gruyère if you’re feeling fancy, or toss in some roasted broccoli for extra veggie power. Dairy-free? Almond milk and nutritional yeast work wonders. My neighbor even adds diced jalapeños for a spicy kick – genius!
Serving Suggestions
This cauliflower “mac” and cheese is crazy versatile – it plays well with so many dishes! My favorite way? Pair it with some juicy grilled chicken for a complete meal that satisfies everyone at the table. On lighter nights, a simple crisp green salad with tangy vinaigrette cuts through the richness perfectly. And confession time: sometimes I just eat a giant bowl of it by itself while standing at the counter. No judgment here!
Storage and Reheating
Leftovers? Lucky you! Store this cauliflower mac and cheese in an airtight container in the fridge for up to 3 days. When reheating, I prefer the oven (350°F for 15 minutes) to keep that creamy texture, but the microwave works in a pinch—just stir every 30 seconds to prevent separation. Pro tip: A splash of milk revives the sauce perfectly!
Nutritional Information
Now, I’m no nutritionist, but I can tell you this cauliflower “mac” and cheese is way kinder to your waistline than the traditional version. The cauliflower works its magic by giving you that satisfying comfort food feel with way fewer carbs. Of course, nutritional values are estimates and vary based on ingredients used – like whether you go heavy on that Parmesan topping (no shame if you do!).
What I love most is that each serving packs in a solid serving of veggies while still delivering that creamy, cheesy goodness we all crave. It’s the kind of dish that makes eating healthier actually enjoyable – no sad diet food here! Just remember, everything in moderation… though good luck stopping at just one helping.
FAQ About Cauliflower “Mac” and Cheese
I get so many questions about this recipe whenever I serve it—here are the ones that pop up most often!
Q1: Can I freeze cauliflower mac and cheese?
Oh honey, I’ve tried—and while yes, you technically can freeze it, the texture changes. The cauliflower gets watery when thawed, and the sauce can separate. If you must, freeze before baking, then thaw overnight in the fridge before popping it in the oven. But honestly? It’s best fresh!
Q2: Is this recipe keto-friendly?
Almost there! With about 10g net carbs per serving, it’s lower-carb than traditional mac and cheese. For strict keto, swap the milk for heavy cream and double-check your cheese labels for hidden carbs. My keto friends go crazy for this version!
Q3: Why does my cheese sauce sometimes get grainy?
Ah, the heartbreak of broken cheese sauce! Usually means the heat was too high when melting the cheese. Next time, take the pan off the heat when adding cheese, and stir slowly—it should melt gently into silky perfection. If it happens? A splash of hot milk and vigorous whisking can sometimes save it!
Q4: Can I use frozen cauliflower instead of fresh?
You can, but fresh really is best here. Frozen cauliflower holds more water, making your dish soggy. If you must use frozen, thaw completely and squeeze out excess moisture in a clean towel—like you’re wringing out a sponge!
Q5: What’s the best cheese substitute for dairy-free?
My vegan sister swears by this combo: nutritional yeast for that “cheesy” flavor, blended cashews for creaminess, and a dash of white miso for depth. It’s different than dairy cheese, but in a delicious way!
I can’t wait for you to try this cauliflower “mac” and cheese and experience that first magical bite! There’s nothing like watching someone take a forkful, pause, then go back for more while saying, “Wait, this is really cauliflower?” Make it tonight, tweak it to your taste, and come tell me all about your cheesy adventures in the comments below. Did your kids notice the veggies? Did you add any fun mix-ins? I’m dying to hear how it turns out in your kitchen—because honestly, this recipe’s too good not to share!
Print
Creamy Cauliflower “Mac” and Cheese with Just 8 Ingredients
- Total Time: 40 minutes
- Yield: 4 servings 1x
- Diet: Low Calorie
Description
A creamy, cheesy twist on the classic mac and cheese, made with cauliflower for a lighter, healthier option.
Ingredients
- 1 medium head cauliflower, cut into florets
- 2 cups shredded cheddar cheese
- 1/2 cup milk
- 2 tablespoons butter
- 1 teaspoon mustard powder
- 1/2 teaspoon garlic powder
- Salt and pepper to taste
- 1/4 cup grated Parmesan cheese (optional)
Instructions
- Preheat oven to 375°F (190°C).
- Steam cauliflower florets until tender, about 8-10 minutes. Drain well.
- In a saucepan, melt butter over medium heat. Stir in milk, mustard powder, garlic powder, salt, and pepper.
- Add shredded cheddar cheese, stirring until melted and smooth.
- Combine cooked cauliflower and cheese sauce in a baking dish.
- Sprinkle Parmesan cheese on top if using.
- Bake for 15-20 minutes until bubbly and lightly browned.
Notes
- For a crispier topping, broil for the last 2-3 minutes.
- Add cooked bacon or breadcrumbs for extra texture.
- Store leftovers in the fridge for up to 3 days.
- Prep Time: 15 minutes
- Cook Time: 25 minutes
- Category: Side Dish
- Method: Baking
- Cuisine: American
Nutrition
- Serving Size: 1 cup
- Calories: 220
- Sugar: 4g
- Sodium: 320mg
- Fat: 15g
- Saturated Fat: 9g
- Unsaturated Fat: 5g
- Trans Fat: 0g
- Carbohydrates: 10g
- Fiber: 3g
- Protein: 12g
- Cholesterol: 45mg